In this blog post, we'll explore how Mask revolutionizes the way you create and manage custom content elements, making TYPO3 development more efficient and user-friendly.
Access to Mask
Once you have followed the simple TYPO3 installation steps, you can start using Mask immediately.
Installation guide
This comprehensive guide will take you through the installation and configuration steps to get you started with Mask without any problems.
Preparations: Before delving into TYPO3 Mask, make sure you have set up your site package. This is crucial for seamless integration and customization.
Adding Mask as a dependency: Adding Mask as a dependency in the ext_emconf.php of your site package is crucial to ensure that TYPO3 Mask is loaded before your theme TYPO3 extension. This order allows you to effectively override Mask's generated TCA in your "Overrides" folder.
Check your current TYPO3 version now with our free TYPO3 Version Checker.
$EM_CONF[$_EXTKEY] = [
    'constraints' => [
        'depends' => [
            'mask' => '8.1' // Add the minimum version here or leave blank for any version.
        ]
    ]
];
Conveniently access the TYPO3 backend module, which is located directly below the extension manager module. With just a few clicks, you are ready to create personalized content elements tailored to your specific requirements.
For Composer installations, you should also not forget the request in the composer.json file of your extension. It's worth noting that in TYPO3 v11, the ext_emconf.php file is no longer required in Composer mode.
{ "require": { "mask/mask": "^8.1" } }
Note: If you add the dependency after TYPO3 Mask has already been installed and activated, it is necessary to rebuild the loading order by reinstalling your extension.
Installation and configuration of TYPO3 Mask:
- Download TYPO3 Mask with TYPO3 Composer by executing the command composer require mask/mask or install it via the extension manager.
- Activate Mask in the extension manager. (Not required in Composer mode of TYPO3 v11)
- Mask requires fluid_styled_content, so make sure it is included in your static bindings in the TYPO3 template module.
- You can install fluid_styled_content in composer mode with the command: composer require typo3/cms-fluid-styled-content.
- Also add the static TypoScript from TYPO3 Mask.
- Switch to the Mask module and enter the key of your page package extension for automatic configuration (your extension must be loaded).
- Start creating your own content elements with ease!
Manual configuration:
If you want to customize the folder structure that is created by the automatic configuration, you can customize each path in the extension configuration of TYPO3 Mask.
Tip: It is recommended to have the LocalConfiguration.php file (where the extension configuration is stored) in the version management to facilitate sharing and collaboration.
New content element wizard
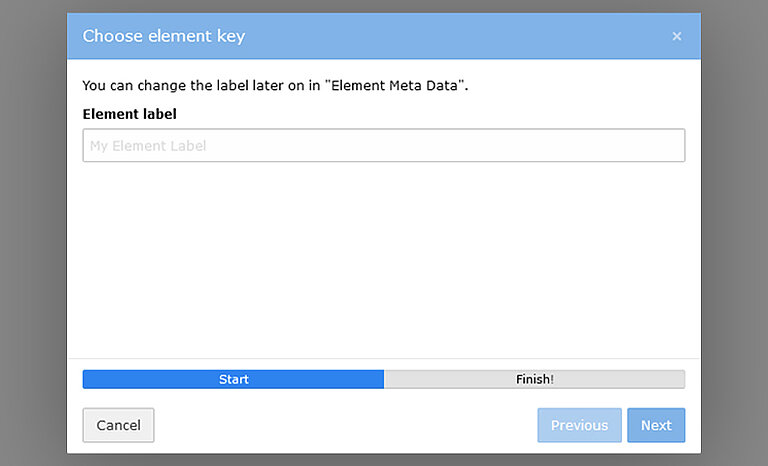
To create your first content element, simply click on the "Create new content element" button. This action will trigger a wizard that will guide you through filling in some mandatory fields.
Name: Enter a descriptive name for this content item that will be visible to editors when the content item is created.
Key (unique, lower case): Assign a unique key to your element. This key is crucial for defining the CType (content type) and generating the Fluid HTML templates associated with this content element. Make sure that the key is unique and in lower case.

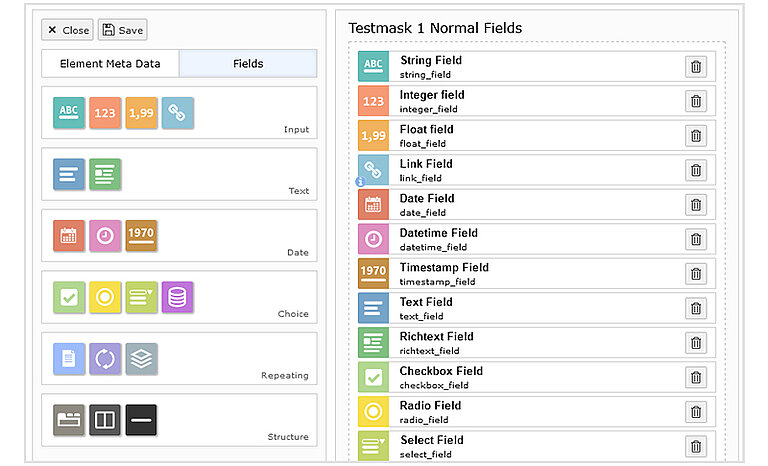
Once you have defined the name and the key, click on "Finish" and the mask builder will open. The "Fields" tab is opened by default so that you can continue with further adjustments.

How do I Create Fields in TYPO3 Mask?
You can now equip your element with various fields. Take a look at the "Field types" page for detailed information on all available field types. Simply drag the desired field into the drag & drop area in the middle of the screen. Alternatively, you can click on a field and it will be inserted below the currently active field. Once inserted, a form will appear on the right-hand side, allowing you to configure the field according to your requirements.

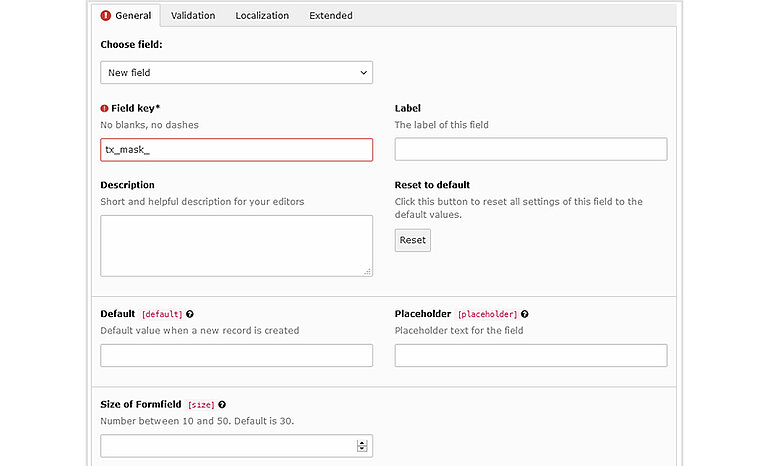
Similar to the element key, you must develop a unique key for your field. User-defined fields always start with the prefix "tx_mask_", which cannot be removed. This prefix is crucial to avoid conflicts with existing fields. In addition, you have the option to choose from existing TYPO3 core fields or TYPO3 mask fields in the drop-down menu.
Most fields share the following options:
- Field key: This is the unique key for the field, as described previously. It determines the name of the new column in the database table tt_content.
- Label: The label is what editors see when they edit the content item. It can be a localized string.
- Description: This provides additional information for editors and appears below the label. It is helpful to guide editors when using the field.
- Reset to default: This option resets all TCA (Table Configuration Array) options to their default values, except for the label and description.
Table Configuration Array (TCA)
The Table Configuration Array (TCA) is important for Mask in TYPO3 development. The TCA defines the structure and behavior of database tables used by TYPO3 to store content items, including custom content items created with TYPO3 Mask.
Here's why the TCA is important for Mask:
Database structure:
The TCA defines the structure of the database tables in which content items are stored. When you create custom content items with Mask, the TCA defines how the data for these items is stored in the database.
Field configuration:
The TCA allows you to configure various properties of fields within content items, such as their type, label, description and validation rules. This configuration ensures consistency and integrity of the data stored in the database.
Integration with TYPO3 Core:
The TCA provides integration with TYPO3's core features, allowing content elements generated by TYPO3 Mask to interact seamlessly with other TYPO3 features and extensions.
Customization and extensibility:
The TCA offers extensive customization options that allow you to adjust the behavior and appearance of content elements according to your specific requirements. This flexibility allows developers to create rich and dynamic user experiences within TYPO3.
Use "Element metadata" Tab With Mask
The "Element metadata" tab provides essential details about your content element in TYPO3. Here you will find general information such as the name and key that you may have defined during creation. You will also find the following fields:
- Short title: this field provides a concise title for your element, which is visible when you select the element type. If it is left blank, the default title will be used.
- Description: By adding a description, editors can better understand the purpose of the element. It appears next to the title and the preview image in the creation wizard.
- Icon: Quickly add a preview icon to your element by selecting from a range of FontAwesome icons. Choose from different categories or search by keyword. If no symbol is specified, a fallback symbol will be generated using the first letter of your label.
- Color: Adjust the color of the icon to improve visual distinction.
Conclusion
TYPO3 Mask revolutionizes content creation in TYPO3, providing a user-friendly solution for easy creation of custom content elements. With its intuitive user interface, flexible customization options and seamless integration with TYPO3, Mask enables developers to create dynamic and engaging websites efficiently. Say goodbye to tedious coding and say hello to TYPO3 Mask - your ultimate tool for custom content creation in TYPO3. Get in touch with NITSAN - Typo3 agency for expert support and guidance.
Contact for Internet agency and TYPO3 projects
Sven Thelemann
Service Partner - Germany


Be the First to Comment