This is exactly what this guide is for. This guide takes you through the complete TYPO3 installation set up process, step by step. No guessing, no skipping.
You will see a clear path from choosing a version to logging into your backend. TYPO3 agency also value this clarity, as everything is easy to understand.
If you have the patience and the hosting skills, you will have TYPO3 installed and ready to use sooner than expected.
So let’s go!
What You Need Before You Start Installing TYPO3
Before you install TYPO3, please verify that your server can fulfill the following requirements:
1. Server Requirements
- PHP: TYPO3 v13 Upgrade needs PHP version 8.2.0 to 8.4.99. Ensure to enable curl, fileinfo, mbstring, and other important extensions.
- Database: A supported database included MySQL (>=8.0.17), MariaDB (>=10.4.3), PostgreSQL (>=10.0), and SQLite (>=3.8.3).
- Web Server: Support for Apache, NGINX, IIS, and Caddy Server.
- RAM: Minimum 256 MB of RAM.
- Composer: A minimum of version 2.1.
Check the official TYPO3 System Requirements page for more information.
2. Software and Access
- FTP Client: A file transfer utility such as FileZilla to move TYPO3 files to the server.
- Hosting Control Panel: You can use your hosting control panel. This could be cPanel or Plesk. It helps you manage your databases and server settings.
- Terminal Access: This is optional but helpful for advanced users who want to use command-line tools for configuration.
- Web Browser: A browser such as Chrome, Firefox, and the like, that you will use to access the TYPO3 installation interface.
Steps for installing TYPO3
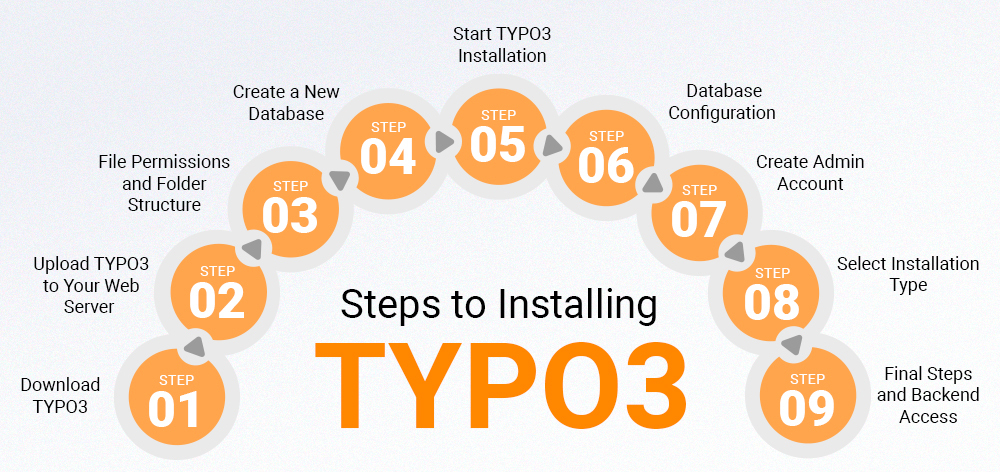
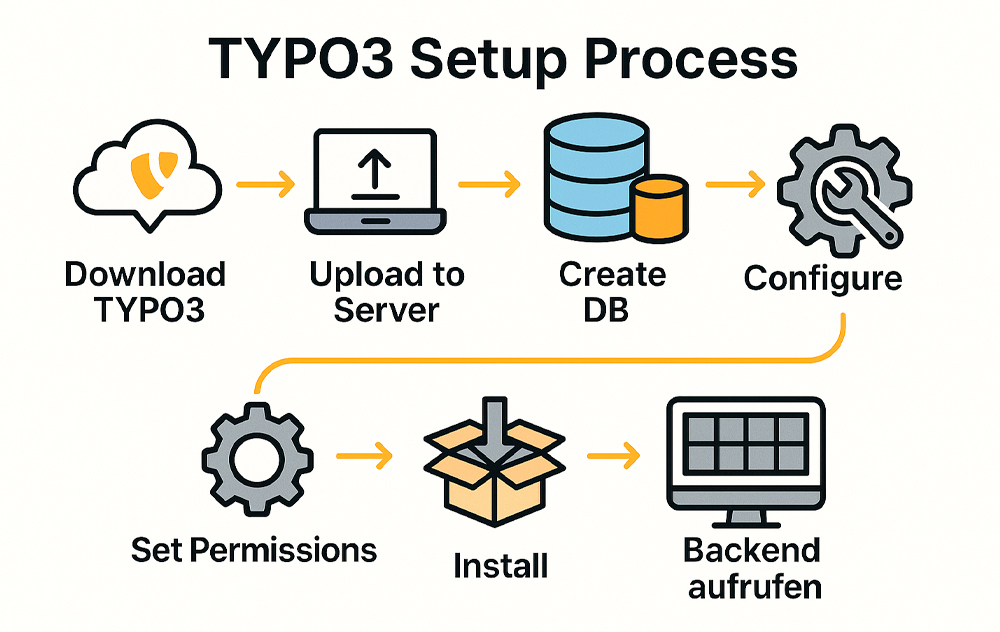
Now that your server is ready, let's cover the steps in installing TYPO3 manually. We'll cover everything, so you will know how to correctly set up TYPO3 on your web server.
Step 1: Download TYPO3
1.1 Go to TYPO3's Official Website:
Go to the official TYPO3 download page. Choose the latest LTS (Long-Term Support) version for a stable installation.
1.2 Choose the Latest LTS Version:
TYPO3 releases a new LTS version every two years. As of now, TYPO3 v12 LTS is the latest version, released in April 2023. TYPO3 v13 is expected to come out in 2025.
1.3 Download the Source Package:
For a manual installation, downloading the Source Package is preferred. The Source Package contains all the files needed to install the TYPO3 system, including documentation.
Alternatively, you can download TYPO3 directly to your server by using command-line tools such as wget or curl. This method is beneficial when installing on servers and avoids the complexity of uploading files through FTP.
wget https:// get.typo3.org/ 13.4.tar.gz
Step 2: Upload TYPO3 to Your Web Server
2.1 Extract Files
- Unzip the Downloaded TYPO3 Archive Locally:
Essentially, you can upload the zip straight through an FTP server and unzip it using SSH. then, on your local machine, it will create a folder with the TYPO3 files. - After that, upload the files using FTP:
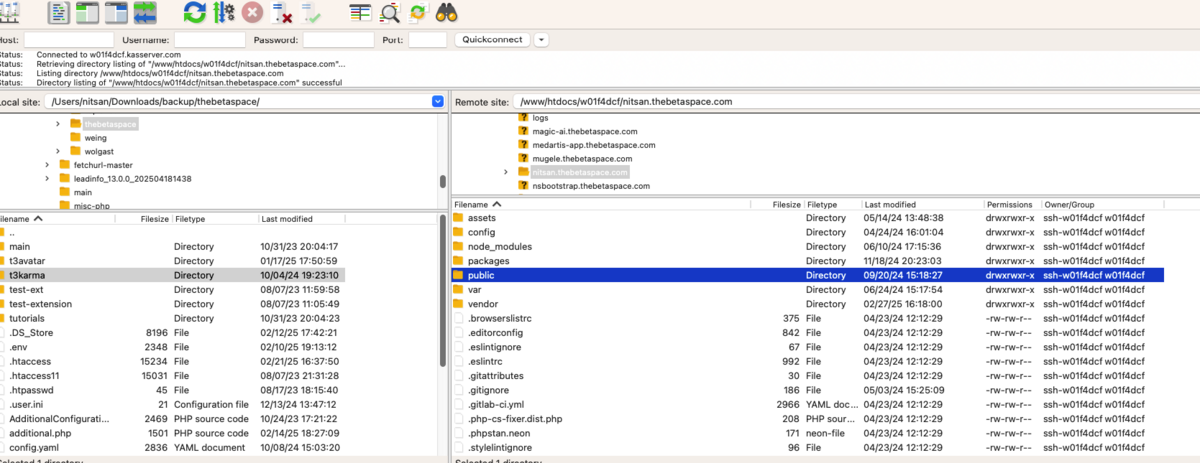
- You can use an FTP client, like FileZilla, to upload the TYPO3 folder. Choose the directory on your server where you want TYPO3 installed.
- You can upload the files directly to your server's document root or a subfolder. This depends on how you want your website structured.
2.2 Set the Correct Document Root
- Ensure Your Web Root Points to the /public Folder:
- After you have uploaded the TYPO3 files, the web root folder must point to the /public folder inside the TYPO3 package. This is important because TYPO3 must run from this directory for security reasons.
- Adjust the document root in your hosting control panel (like cPanel or Plesk) to this folder, if necessary.
Note: “If you use NGINX or Apache, you might need to change the server settings to use the right document root.”
Step 3: File Permissions and Folder Structure
3.1 Set Write Permissions:
TYPO3 has limited directories that it will need to write into to store its files and any configuration data. Use your FTP client or a terminal. Set file permissions to 664. Set directory permissions to 775 on these directories:
fileadmin/
typo3conf/
var/
3.2 Verify Permissions:
Ensure your web server's username (typically www-data or apache) has write permissions on these folders. If the permissions are incorrect, the installation process will fail, preventing TYPO3 from working correctly.
Step 4: Create a New Database
4.1 Log into Your Hosting Control Panel:
Log in to your hosting control panel, like cPanel or Plesk. Then, open phpMyAdmin or your preferred database manager.
4.2 Create a New Database:
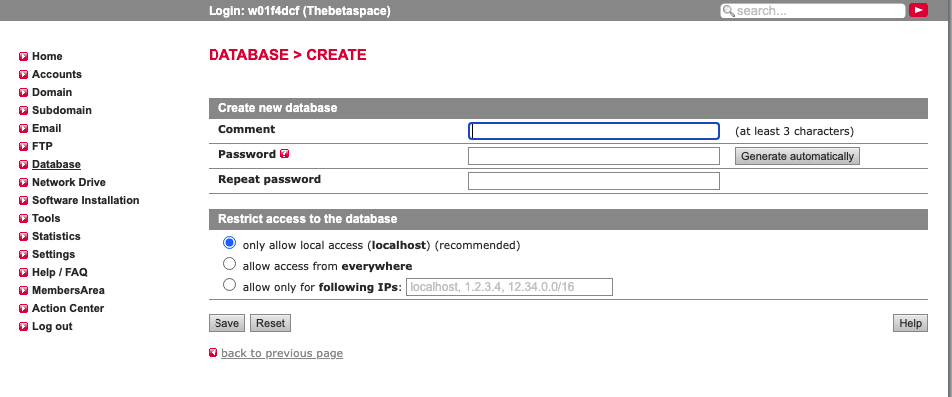
- Database Name: Create a new database for TYPO3. It is recommended that UTF-8 be used for the encoding.
- Create New User: Create a new user with full rights to the database. Write down the username, password, and database name, as you will need these during installation.
Step 5: Start TYPO3 Installation
5.1 Launch the Installer:
- Visit Your Site’s Domain:
Open your web browser and navigate to your domain (e.g., https://yourdomain.com). You should see the TYPO3 installation page. Double-check your file permissions and document root configuration if it doesn't show up. - Create the FIRST_INSTALL File:
To create an empty file called FIRST_INSTALL, follow these steps:- Place the file in the root directory of your TYPO3 installation.
- This file will start the TYPO3 install tool.
- The installation process will then begin.
5.2 System Environment Check:
- TYPO3 Automated Check:
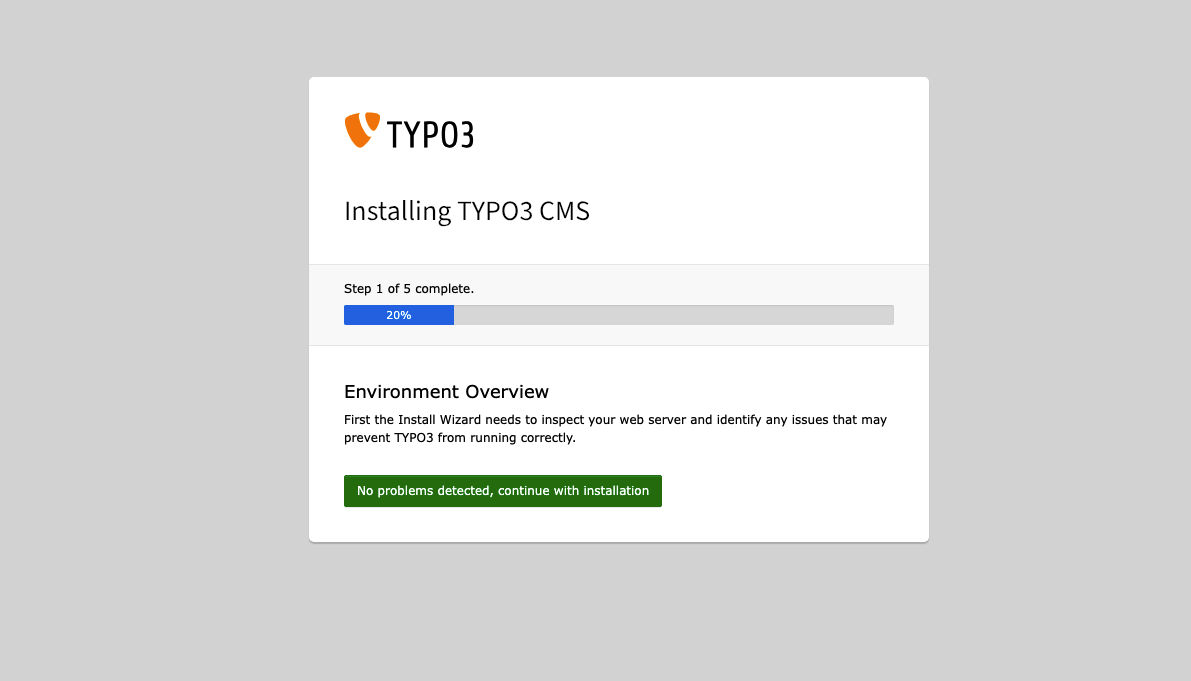
When you launch the installer, TYPO3 will automatically check your server environment to ensure everything is correct. This means checking PHP versions, whether database connections work, the ability to write files, and other system settings. - Resolving Problems, if you happen to have them:
If you happen to have any problems, like missing PHP extensions or low memory, solve them before continuing. The installation tool will tell you how to solve the problem.
Step 6: Database Configuration
6.1 Enter Database Credentials:
When you get to the install screen, you will have a place to enter the database information:
- Host - This will usually be localhost, unless you host your database elsewhere.
- Database Name - This will be the database name you created earlier.
- Username - This should be the database username with full permissions.
- Password - This is the password you set for your database user account.
6.2 Database Schema Setup:
TYPO3 will create the database tables, set the schema required for your site, and install everything for you. There is nothing that you need to do manually in this.
Step 7: Create Admin Account
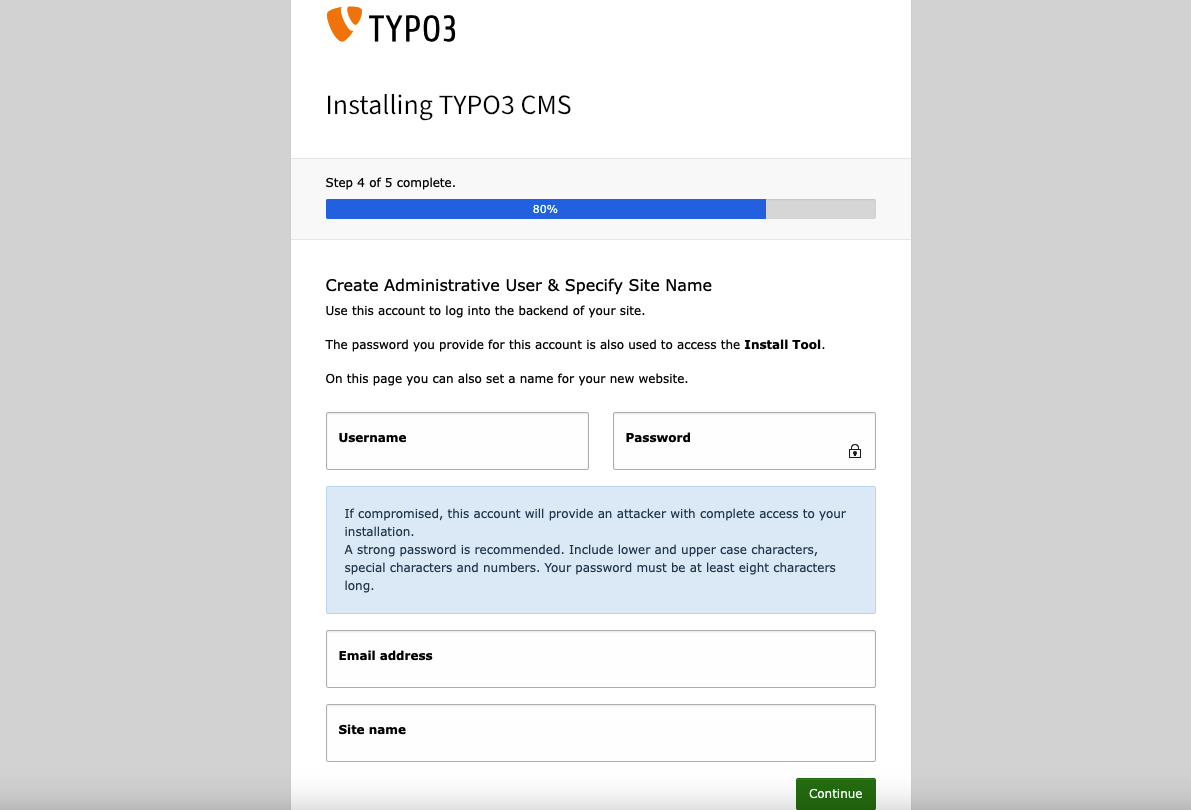
7.1 Admin Username and Password:
Select a secure admin username and password. You will use that account to log into the TYPO3 backend to manage your site.
7.2 Enter Your Email Address:
Enter a valid email address that will get used for your admin account.
7.3 Set Your Site Name:
This is where you will enter your website name for the site. You can change this later in the backend if you want to.
Step 8: Select Installation Type
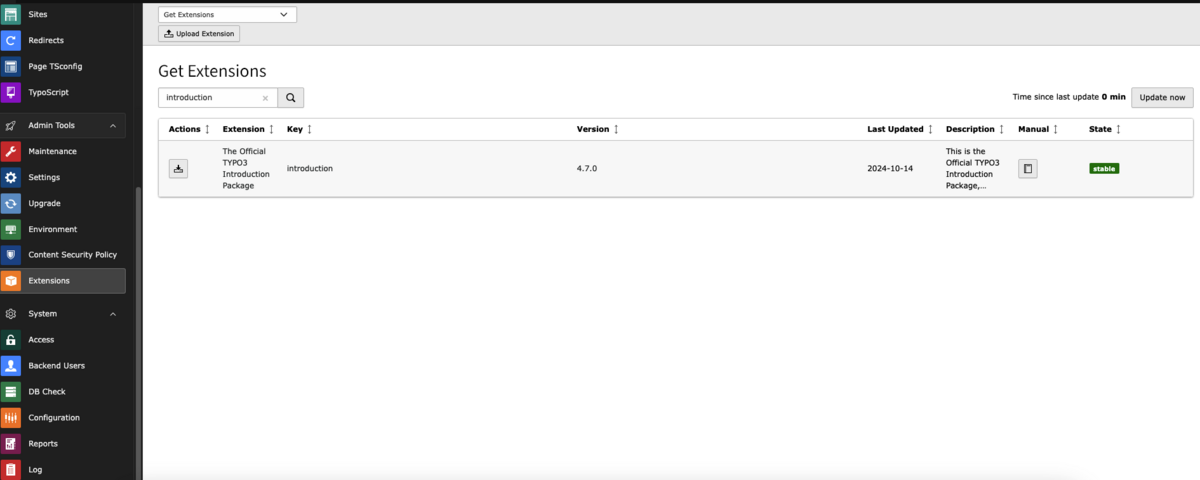
8.1 Introduction Package:
If you are new to TYPO3 or want to start your project, choose the Introduction Package. It has sample content available. This option installs a demo site with sample content and layouts to help you get familiar with TYPO3.
8.2 Blank Installation:
If you are an advanced user or want a blank site to start, select the Blank Installation. This installation will set up TYPO3 without any content or pre-made layouts. You can then use it for your custom project.
Step 9: Final Steps and Backend Access

9.1 Installation Complete:
After the installation, you will arrive at the core system files that TYPO3 generated to run the CMS.
9.2 Access the Backend:
Now you can work with TYPO3 by navigating to the TYPO3 backend interface at https:// yourdomain.com/typo3. Log in using the administrator credentials created during the setup process.
Post TYPO3 Installation Tips
Once TYPO3 is working, there are a few things to think about. You should secure your site, improve its features, and ensure it stays stable over time.
1. Remove FIRST_INSTALL File
When the installation is done, TYPO3 will leave a file named FIRST_INSTALL in the root directory. This file is the installation tool and will not work for you after installation.
Please remove or rename the FIRST_INSTALL file right away. This will prevent unauthorized access to your setup wizard.
2. Configure Clean URLs
TYPO3 supports clean URLs that are friendly to search engines, but your server must be configured.
- Apache: TYPO3 delivers a default .htaccess file. Please make sure you have mod_rewrite enabled to support .htaccess.
- NGINX: In Nginx, you must define clean URL rules in the conf file.
Once you defined clean URLs, please test your frontend URL. If you see index.php?id=1 in the URL you will need to adjust your rewrite rules.
3. Update and Extend TYPO3
TYPO3 is built to be extended. After logging into the backend, go to the Extension Manager. Here, you can browse and install official or custom extensions. You can also check for core updates to keep everything current.
TYPO3 regularly releases security and maintenance updates. Keeping your system updated is important for better performance and security.
4. Set Up a Backup Strategy
Every Content Management System needs to have backups. You will want to have a backup system in place that backs up both:
- The file system (your TYPO3 files and uploads)
- The database (this is where all your content and config live)
Use your hosting provider's built-in backup tools, or install a TYPO3 extension to automate backups. Regular backups will give you peace of mind.
Conclusion
Installing TYPO3 does not need to be complicated. Using a step-by-step approach is entirely manageable, even if you have not done it before.
You can create a strong and reliable Content Management System. You can do it yourself or work with a TYPO3 Agency. Now you've got everything set up and are ready to go.
Log in to the TYPO3 backend, set up your first pages, and see what TYPO3 can do.
Now you can go and create something awesome, your TYPO3 site is ready!
Contact for Internet agency and TYPO3 projects
Sven Thelemann
Service Partner - Germany


Be the First to Comment